
Is It Easy To Install A Cat-Proof Fence?

Is It Easy To Install A Cat-Proof Fence?
Cat-proof fencing has become a popular concept in recent years. There are a few home-made DIY (Do It Yourself) options that can be found on the internet that offer tutorials on how to make your cat-proof fences from materials you can purchase from your local home improvement store such as PVC piping on wiring. However, we'd like to share that while these DIY options may look promising, they'll only work to a certain degree, they’ll need regular maintenance and, if the wire loosens, your system (and your cat) is as good as gone. Not to mention, they look cheap and nasty!
If you're looking for a ready-made cat-proof fencing option that's both practical and effective, then Oscillot's Cat-Proof Fence Kits may be exactly what you’re after! Available in in a range of different sizes, the preparation has been done for you (not to mention the quality is outstanding!). & guess what?... If you have an existing fence, then the work is half done, Oscillot is just a fence addition at the end of the day!
Most installations of Oscillot on top of fence lines only take a matter of hours and require only a few tools. If you don't have the tools, or don't have the time to install, you can get a local Handyman to do the installation for you.
Before we take a quick tour of what is involved in installation of this spinning-paddle cat-proof fence system, let's first touch on a few things that you should take the time to consider before purchasing and installing
- Oscillot is designed to prevent cats from scaling fences with a minimum height of 1.80 metres when installed correctly in accordance with the Installation Guide on a suitable fence type and yard setup. The recommendation of 1.80 metres is made as it is the height at which the system has been extensively tested and has proven to be safely and reliably effective.
- It’s important that before installing Oscillot, you check that your existing fence secures the full perimeter of your yard. If you see any gaps in the fence, then blocking them off will help in the effectiveness of the overall cat-proofing process.
- Cats are really curious species, so they'll surely bolt if given a chance—yes, that includes digging under the fence to find an exit. So, make sure that your cat cannot dig or crawl under the fence. There are some ideas on the internet to help you with cat-proofing under the fence line, have a Google and you’ll see some suggestions with chicken wire and other sturdy wire frames which can be installed just under the fence line in the ground to prevent curious kitties from digging out.
- For some fence setups, in particular timber fences with the posts and rails on the inside of the fence, an extra cat-proofing measure in addition to installing Oscillot may in some instances be required. This is due to the ‘climbability’ of some timber fences. For more than 90% of installations though, installing Oscillot alone is adequate and will result in effective cat-proofing of the fence to keep your cat safe at home.
- It is also important that you keep your fence clear of any significant objects or structures that your cat may use to scale the fence, e.g. garbage bins, building materials, or any other similar structure. Sturdy shrubs and bushes might also be an effective launching pad for your feline friends, so it is better if you don't have them too close to your fence.
- If you have any trees in your backyard, you might also want to consider installing tree guards around the trunk of any trees located close to the fence. Check if you have to remove any tree branches overhanging the fence as well.
 Tree Guards & Oscillot Keeping Curious Cat Contained
Installing Oscillot is as easy as 1, 2, 3 (and maybe 4, 5 and 6!)
You’ll need a few tools to install Oscillot including a hammer, screwdriver, and saw. You'll also need a drill, a 150mm Phillips driving bit, a 2.5mm drill bit, a tape measure, marking pen, mitre box, and an electric drop-down mitre with an aluminum cutting blade (if you don’t have an electric saw, a fine-tooth aluminum hand-saw will do).
The system comes with components including a Post, Cap, Pins and Balls as well as screws and Brackets for timber fence installations. These are all included in the Cat-Proof Fence Kits along with the Paddles (the long, four-bladed aluminium component)
We won’t go into too much depth with the installation process in this blog, but safe to say we think installation is actually easier than you’d think a system that can cat-proof your yard in its entirety! If you want to see exactly how installation is done, you can check out the Installation Guide.
We will run you through an overview of what you can expect when installing this cat-proofing system.
- At your starting point at one end of fence line, a Post is fixed into place
 First Post fixed into place
- Insert Pins into each end of Paddle, place Balls on to Pins. It's important than 1mm of ‘give’ is left between the ball and the axle pin, to allow the Paddle to spin freely. Make sure you do this with every Paddle, both sides.
 Pins inserted into Paddle, Balls added, 1mm of 'give'
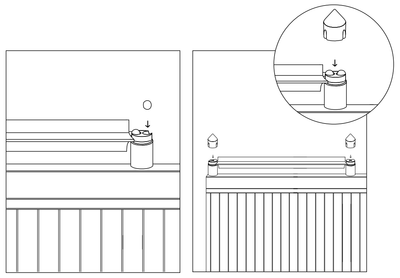
- Taking the length of the Paddle into account, another Post is installed a distance away. The second Post will soon be screwed into place, once you’ve made sure they are the correct distance apart by placing a Paddle (with pins inserted into each end) into place up onto the Posts with Balls also in their joints to check the distance is right. Then remove briefly so the Posts can be screwed into place and then return the Paddle and place the Cap on to secure the Post Kit.
 Next Post put in place

Next Post fixed in place, Paddle put into position, Cap pushed on
- Installing Oscillot is basically repeating these first three steps over and over for the length of each fence run. As you now have Post number two fixed to the fence with screws, insert the next Paddle with axle pin inserted, into the fixed Post then go on to measure where you will put the third Post. Continue this with the fourth, fifth, sixth etc, Post until you reach the end of the fence run.
 Repeat with the next Post in place, add Paddle, check distance, fix Paddle, add Cap
- When you reach the end of the first fence run, start with a new Post on the adjacent fence run. Try and get these Posts to overlap as best as possible in the corners so as not to leave any open space for a paw to sneak through.
- Continue to install repeating the same steps for the length of the entire fence line. At the end of each fence run, and for gates, you’ll likely need to cut down a Paddle. This is totally normal and part of almost every installation. Paddles are designed to be cut down to size as required -then an Pin inserted as normal. Off cuts can also be used to prevent wastage. Paddles can be cut using a drop down saw or a hack saw as outlined in the Installation Guide.
 Paddles are designed to be cut down to size as required
As good as done, fantastic! What did you think? We told you it was easy!
We’ve tried to give you an overview of the installation process for this cat-proofing system for the top of your fence, whilst keeping it pretty short and sweet.
At the end of the day, we want the best for our purr-babies. We want them to be safe, first and foremost, but still be able to exercise and bask in the sunshine within our property. Oscillot's solution to cat-proofing system is a great option for doting cat owners looking for a relatively straight forward (and good looking!) solution that they can install themselves relatively easily and without too much hassle.
As long as your cat is kept safe and sound, no matter which cat-proofing option you choose to buy and install, your cat is protected and everyone’s happy!

Leave a comment